Email remains one of the most heavily used communications
mediums within organizations today. With as much as 75 percent of your
organization’s intellectual property stored in email[1], Microsoft
Exchange is for all practical purposes a treasure trove of organization’s most
valuable secrets—just waiting for inappropriate access.
Regulatory bodies realize this and therefore email and
compliance go hand in hand-in-hand. So
IT needs to keep a watchful eye on exactly who is accessing what within Exchange
Online. And that focus shouldn’t be only on the people you trust, such as those
who have been granted access to a given mailbox, but on any user. IT needs to help ensure visibility into the actions of
potential threat actors who might have hijacked privileged accounts. The first
thing external threat actors do after infiltrating your network is attempt to
identify accounts that have elevated permissions. And those accounts can have
access to the sensitive information stored within Exchange Online.
For years, Microsoft has enabled an audit trail within
on-premises Exchange Server. The same capability exists for Exchange Online—with
some improvements to boot—giving IT organizations visibility into actions
performed by administrators and regular users alike. But be forewarned: You’re
largely on your own here. Microsoft has provided some functionality via
administrative consoles, but the ability to successfully enable, configure, and
audit Exchange Online events depends fairly heavily on PowerShell[LP1].
The challenge isn’t configuring the auditing of events; that
part is simple. Rather, the challenge is finding the event or events that are pertinent
to the auditing query in question. If you’ve spent any time in Event Viewer,
you know how it feels to rummage through countless thousands of event entries,
trying to find the one entry you’re looking for.
Microsoft has taken great strides to provide you the tools
necessary to simplify the process of auditing. Still, a bit of work remains to
enable, configure, and retrieve meaningful audit data.
This whitepaper explains those necessary steps and provides
guidance for properly auditing changes to your Exchange Online environment
within Office 365. The paper also covers ways to focus your auditing lens on
the right what, who, and where so that
you can quickly and accurately find answers to those sometimes difficult
auditing questions.
Auditing
Experts – Quest
Understanding what’s going on within
Exchange Online involves much more than the ability to centralize audit data.
To truly audit such complex environments, you need a deeper understanding of each
event and its detail, how audit events correlate, and what that information means
to the organization—along with the ability to make the data understood.
Quest Change Auditor is the culmination
of tens of thousands of hours of work dissecting every auditable event over a
variety of platforms and applications. This effort turns raw, indecipherable
information into intelligent detail, from which an IT organization can obtain
actionable insight.
Look for auditing insights from Quest
throughout this paper.
Connecting to Office 365 to Enable and Configure Auditing
The first step is to enable auditing. Auditing is disabled
by default, as not every organization is required to — or even interested in — auditing
what happens within Exchange Online. As previously mentioned, much of this step
happens in PowerShell. You’ll need to connect to Exchange Online via PowerShell
so that all commands are run against your instance of Exchange Online.
Open a PowerShell window. You don’t need to be a local admin
to run Exchange commands against the cloud, but you do need appropriate
permissions within Exchange Online; more on these permissions
soon.
To connect to Exchange Online, you’ll run four commands.
Set-ExecutionPolicy RemoteSigned
This command tells PowerShell that any scripts that are downloaded
by a trusted publisher (Microsoft, in this case) can run on the local computer.
$UserCredential = Get-Credential
This command displays a login dialog box that you use to
store an Office 365 admin credential (which does not necessarily need to be the
same credential you used to start the PowerShell window) as a parameter for use
in the third command.
$Session = New-PSSession –ConfigurationName
Microsoft.Exchange –ConnectionUri https://outlook.office365.com/powershell-liveid/ -Credential $UserCredential –Authentication Basic –AllowRedirection
This command establishes a new PowerShell session with Office
365, using the provided credentials and the specified URL. The command stores all
this information in the $Session
variable.
Import-PSSession $Session
This command imports commands
(e.g., cmdlets, functions, aliases) from the remote computer (i.e., Office 365)
into the current session. At this point, you’re properly connected to Exchange Online and can begin auditing
your Exchange Online environment.
Quest
Insight – What Should You Be Auditing?
Exchange Online can be configured to
generate a ton of information—which, of course, means more data for you to sift
through. Because you are essentially in control of how much audit data is generated,
you can determine which activities to include. You can focus on three categories
of audit activity:
·
Message tracking
is the actual flow of messages from one user to another. At a minimum, this
category can be used to show who is emailing whom, such as whether email is
being sent to a competitor. On a larger scale, message tracking can be used
with analytics to see how the business uses email. This tracking is useful to
see how internal messaging flows; for example, from one department to another. Message
tracking can also be used to see the flow of traffic in and out of the
organization; for example, which domains send or receive the most email. You
can use the Get-MessageTrace cmdlet
to retrieve a list of messages that meet query criteria such as sender or
recipient address, date range, or source IP address. This activity is most
appropriate when a review of specific sent and received messages is needed in
addition to a review of mailbox contents. This tracking can also be useful when
connected to a SIEM solution, using keyword alerts to identify inappropriate
messages.
·
Admin operations
involve any actions that are taken within Office 365, including actions by your
IT team or Microsoft (which maintains the Exchange Online instance). Admin
operations, such as assigning permissions to a mailbox or setting up forwarding
rules, can play a key role during an audit; even IT can play a role in
inappropriate behaviors.
·
Non-owner
mailbox access occurs whenever someone other than the owner accesses a
mailbox. This category is important when sensitive information has been
inappropriately accessed or forwarded, and the focus is on identifying who is
responsible.
Because message tracking typically falls outside an IT
security audit, this paper foregoes that topic and focuses on the other two audit
areas, which directly affect your organization’s ability to document access,
changes, and actions that would be of interest during an audit.
Auditing Admin Operations
Auditors are big believers in the ability to watch the
watchers. Questions around changes that IT has made are just as important as those
that focus on users exercising access that IT has granted. For example, if an
audit revolves around the CEO forwarding intellectual property to a competitor,
a good auditor doesn’t just accept that the CEO forwarded the information.
Rather, the auditor also asks who has been granted permissions to the CEO’s
mailbox—and who in IT granted those permissions.
Both security and compliance initiatives are useless without
auditing admin operations. Because there are no preventative controls for
admins (who need the ability to do “everything” to get their job done), the
need for controls that detect and deter inappropriate behavior is necessary. By
putting an audit trail in place, you create accountability. After all, knowing that
they’re being audited tends to encourage admins to keep their behavior in
check.
When it comes to Exchange Online, a number of actions can
indicate malicious activity. For example, the exporting of a mailbox doesn’t
require logging on to the mailbox; IT can simply export and review the local
PST. Therefore, IT logging on to an exported mailbox should trigger non-owner
mailbox auditing. Another example is granting permissions: IT could assign a
cohort inappropriate permissions to another user’s mailbox, and then remove those
permissions after improper access is completed. Unless you have non-owner
mailbox auditing enabled, this access would go completely unnoticed.
You can see why admin operations need to be included as part
of your auditing strategy. Everything an admin does within Exchange Online is
ultimately a PowerShell command, so Exchange audits admin activity at the PowerShell
level. Each time an audited cmdlet is run, the action is logged.
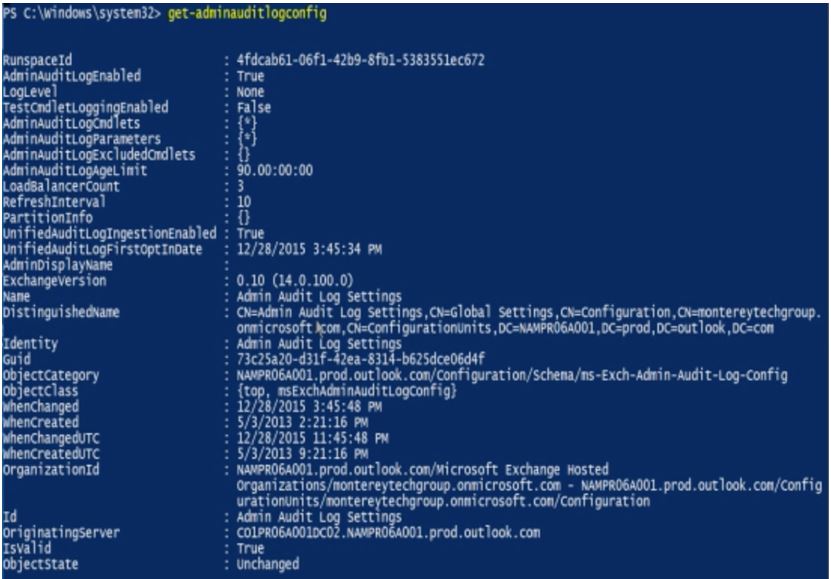
To check which auditing is enabled within your organization,
you can use the Get-AdminAuditConfig
command, shown in the following figure.
Place specific focus on the AdminAuditLogCmdlets, AdminAuditLogExcludedCmdlets, and AdminAuditLogParameters fields, which
identify whether every admin operation is audited or a subset.
Quest Insight – Age Limits
By default,
admin audit data is kept for 90 days (as indicated by the AdminAuditLogAgeLimit value in the previous figure). You might want
to consider extending the retention time. Organizations that perform annual
audits should consider extending this value to more than 365 days (one year).
To enable auditing, you need
to leverage the Set-AdminAuditLogConfig
cmdlet:
Set-AdminAuditLogConfig
–AdminAuditLogEnabled $true
Quest
Insight – Enabling Just the Right Amount of Admin Auditing
Each organization has different auditing
requirements, so auditing of admin actions isn’t always as simple as “just
audit everything.” If you simply enable all
admin auditing, you’ll see all the changes that Microsoft makes on the back end,
which might be something you don’t care to filter through during an audit.
Because admin auditing is based on the
premise that every performed action relates to running a PowerShell cmdlet, the
Set-AdminAuditLogConfig cmdlet enables
you to specify which cmdlets and cmdlet parameters to include or exclude. Be
sure to note that auditing of commands in Exchange Online does not include
read-only types of commands, such as any Get
and Search commands.
You can specify individual cmdlets or use
wildcard characters to denote a group of cmdlets:
Set-AdminAuditLogConfig –AdminAuditLogEnabled $true
-AdminAuditLogCmdlets * -AdminAuditLogParameters *
-AdminAuditLogExcludedCmdlets *Mailbox*, *TransportRule*
So, how do you get
this information out of Office 365?
There are two ways to extract admin auditing information from
Office 365: via PowerShell or by using the Office 365 Security & Compliance
portal.
Auditing via PowerShell
Using PowerShell to audit can be accomplished by using the Search-AdminAuditLog cmdlet. When you use this cmdlet with no filtering
parameters, you obtain the last 1000 entries. This information shows the
cmdlets and parameters that were used, who ran each action, whether the action was successful, the object affected, and more, as shown in
the following figure.
The Search-AdminAuditLog
cmdlet results don’t provide comprehensive detail; for example, the Caller field, which specifies which
users called the cmdlet, is blank. So the cmdlet is more useful if you’re
trying to get an overview of changes made rather than performing an actual
audit.
You can alternatively use the New-AdminAuditLogSearch cmdlet to receive an emailed XML report of
the log entries within a specified date. For example, in the following figure,
you can see that an admin is adding full mailbox permissions to the user bbrooks.
Quest
Insight – Filtering Cmdlet Searches
The basic cmdlets return a large amount
of data that might include the behind-the-scenes management actions performed
by Microsoft. So it’s important to use the cmdlet’s parameters to filter the
noise of all the resulting data.
Both the Search-AdminAuditLog and New-AdminAuditLogSearch
cmdlets enable you to filter by date, cmdlet used, parameters used, the user
who performed the action, whether that user is external to the organization,
and the objects that the action affected.
By using some of these filters, you can hone
down the results to a more pertinent set of data, increasing your productivity
by more quickly finding the answers you need.
Auditing via the Office 365 Security & Compliance Portal
Those who simply aren’t “PowerShell people” and would rather
use a management console can take advantage of the Audit Log Search
functionality in the Office 365 Security & Compliance Portal. In the
pre-created Activities, you can begin
your audit by simply selecting a management action, such as the delegation of
mailbox permissions in the following figure. You can use the additional filter
fields to further refine the results to the few that meet your criteria.
Be aware that the Activities
are a double-edged sword.
You are limited to those activities (with the supported filters) and cannot
generate custom search scenarios of your own. For example, you can’t search for
every time someone exported a mailbox (at the time of this writing).
Results can be exported as well, for reporting and further analysis.
You will experience a few limitations should you choose to use
the console. First, you’re limited to only 90 days of audit data — and there’s no
way around that. In addition, although audit data is available to PowerShell
cmdlets within 30 minutes, accessing the same data via the console can take up
to 24 hours.
Auditing Non-Owner-Mailboxes
Auditing administrative actions helps to identify the events
leading up to inappropriate activity within Exchange. But the real value is
found in auditing access to the data that is stored within Exchange. The
assumption with non-owner mailbox auditing is that the mailbox owner is using
the mailbox appropriately. (Sure, cases of insider misuse by a mailbox owner
exist, but those issues are addressed by message tracking.) So, the focus
shifts to any non-owners that access a given mailbox.
In general, you should be concerned any time a non-owner
views, sends email on behalf of, or deletes email in another user’s mailbox.
Delegates — a part of Exchange for as long as the product has been available — are
a vital part of the productivity of many users who require assistance from
other employees. But because delegate access exists, and because inappropriate
delegate access can be granted, auditing non-owner access to mailboxes provides
an important piece of data.
Quest
Insight – Which Mailboxes Should You Audit?
Which mailboxes to audit is a valid
question. Find the answer by considering these questions:
·
Is there
any delegate access? If so, turn on auditing. This way, you have an audit
trail of every time the delegate accesses the owner’s mailbox and what was
done.
·
Does the
mailbox contain sensitive data? Mailboxes that are owned by users who regularly
send and receive financials, intellectual property, legal documents, and so on might
be prime targets for insider activity. Even when no delegates are assigned to a
mailbox that contains sensitive data, enable auditing proactively so that you
have an audit trail of any and all access to the mailbox.
Unlike admin auditing, which is an organizational-wide audit
setting, non-owner mailbox auditing is enabled on a per-mailbox basis. Audit
log entries are retained, by default, for 90 days—a value that can be
customized.
You can enable non-owner mailbox auditing at three levels,
each with specific audited actions:
- Admin.
This level audits actions by admins who have not been granted delegate
permissions to a mailbox.
- Delegate.
Anyone who is assigned permissions or given Send
on Behalf of permissions is considered a delegate.
- Owner. Auditing for the mailbox owner is typically
disabled, as it isn’t relevant to audits. In addition, enabling owner auditing generates
a great deal of information. Non-owner access is generally infrequent and
limited in scope (e.g., an assistant sending out calendar invites for their
boss, someone in IT finding a specific message), whereas audits of owner access
encompass every email created, read, filed, deleted, and so on.
|
Action
|
Admin
|
Delegate
|
Owner
|
|
Copy
|
ü
|
|
|
|
Create
|
ü
|
ü
|
ü
|
|
FolderBind
|
ü
|
ü
|
|
|
HardDelete
|
ü
|
ü
|
ü
|
|
MailboxLogin
|
|
|
ü
|
|
MessageBind
|
ü
|
|
|
|
Move
|
ü
|
ü
|
ü
|
|
MoveToDeletedItems
|
ü
|
ü
|
ü
|
|
SendAs
|
ü
|
ü
|
|
|
SendOnBehalf
|
ü
|
ü
|
|
|
SoftDelete
|
ü
|
ü
|
ü
|
|
Update
|
ü
|
ü
|
ü
|
Enabling Non-Owner Mailbox Auditing
Like admin auditing, non-owner mailbox auditing is enabled by
using PowerShell via the Set-Mailbox
cmdlet. As previously mentioned, this action is accomplished on a per-mailbox
basis and requires that you specify which level or levels of auditing (admin,
delegate, or owner) you want to enable:
Set-Mailbox –Identity “John Smith” –AuditDelegate SendOnBehalf,FolderBind
–AuditEnabled $true
AuditDelegate
in this command. This parameter enables
mailbox auditing, but only for delegate access and only for the specified actions.
You either need to perform this command a second time to configure auditing of Administrator
access, specifying which actions should be audited (as shown in the following
command), or include the AuditAdmin
parameters in the same execution of this cmdlet:
Set-Mailbox –Identity “John Smith” –AuditAdmin
Copy,MessageBind
-AuditEnabled $true
Organizations that audit the mailbox access of every user must enable mailbox auditing
for new users. This approach might require a bit more PowerShell scripting, to
continuously perform a search for a user account with a recent create date and to
run the previous commands against that account.
Quest
Insight – Which Actions Should You Audit?
You should enable both admin and delegate access to help ensure that any
(and every) instance of non-owner access is recorded. Auditing of most of the previously
mentioned admin actions is automatic whenever auditing is enabled for a given
mailbox, with the exception of MessageBind
(which for all intents and purposes can be considered a reading of a message)
and Copy. Auditing of these actions needs
to be enabled separately (as explained earlier). Also note that whenever an
admin is assigned Full Access to a
mailbox, that admin is considered a delegate user and is audited as such.
Like admin, some delegate actions (i.e., Create, HardDelete, SendAs, SoftDelete, and
Update) are also automatically
audited. Therefore, you need to enable auditing for any other actions that you want
to log.
Some organizations use solutions that
scan mailboxes for compliance, identification of sensitive data, categorization
for legal purposes, and so on. Such solutions might trigger bogus events
because of their access of a given mailbox. In such situation, you can use the Set-MailboxAuditBypassAssociation cmdlet
to bypass auditing for a specific, trusted account.
Now that you have enabled
mailbox auditing, how do you get your audit logs out?
This process is a bit complicated, as it depends on how many
mailboxes you need to audit, how much detail you want to obtain, and whether
you need the raw audit data or a report format. You have a few options:
- Synchronously
via PowerShell. You can use the Search-MailboxAuditLog
cmdlet to search a single mailbox’s audit log entries. The cmdlet displays
search results in the Exchange Management Shell window and provides limited
detail that might not meet your auditing requirements.
Asynchronously
via PowerShell. You can use the New-MailboxAuditLogSearch
cmdlet to search through the audit logs of one or more mailboxes, with the results sent to a specified
email address as an XML file. If you want to pull audit data into your SIEM
solution, use this option. Should your cmdlet query criteria generate too many
results, then the received email simply informs you that the query was a
failure. You’ll need to further hone the results to a smaller data set,
potentially requiring the combination of multiple XML files to represent a
complete audit of all actions. Be aware that Exchange 2016 allows only 10
searches of this type per mailbox within a 24-hour period.Exchange
admin center reports. From within the Exchange admin center’s reports
section (not the Office 365 Security
& Compliance portal), you can run a Search
for mailboxes accessed by non-owners report. However, you cannot export
this data.- Office
365 Management Activity API. Microsoft provides a RESTful API to access
audit data. This API requires some significant development, so it might not be an option for most organizations. However this is the only viable option
for getting your all your audit data out of the cloud and into a
compliance-ready secure archival and monitoring platform. To be compliant you have to use this API.
It can take up to 24 hours for events to show up in the unified
audit log where they are stored, so you should expect some latency around audit
requests. Also note that none of these options make it truly easy to obtain the
information you need. Some don’t provide the necessary granularity, whereas others
require that granularity if they are to be valuable. Think of each option more
as another tool to access raw data than as an auditing solution designed to
provide you with correlated, formatted intelligence around performed actions.
Meeting Compliance and Security Requirements
The good news is that Office 365 does capture the audit
data you need. But compliance and security require more than just capture audit
data. You have to protect, archive and
most importantly monitor that audit data. And monitoring means correlating with other security information from
your environment so that you can actually detect attacks and misuse.
So the bad news is that if there is no way you can meet
enterprise compliance and security requirements with the out of box
functionality of Office 365. You must
either write your own application to access the Management Activity API or
exploit a solution that does that for you.
Enter Quest Change Auditor. Change Auditor now integrates audit logs from Exchange Online with the
rest of the activity Change Auditor collects, normalizes and monitors from all
over your network. The latest version of
Change Auditor implements the Management Activity API and other APIs from
Office 365 to automatically collect Exchange Online mailbox and administrator
audit logs. Change Auditor brings to
Exchange Online the same Who, What, When and Where capability ChangeAuditor is
famous for. And the cool thing is now
you see what a given user like Bob is doing both in the cloud and on your internal
network because ChangeAuditor already monitors
- Active Directory
- SharePoint
- Windows
- SQL Server
- Network Attached Storage
- Lync
- VMware
You can’t be compliance without monitoring your environment
and that fact doesn’t go away when you move to the cloud. Office 365 captures the activity required by
enterprises for compliance but it’s up to you after that. Change Auditor solves this issue and puts
cloud activity and on-prem events on the same pane of glass.
About Randy Franklin
Smith
Randy Franklin Smith is an internationally recognized expert
on the security and control of Windows and AD security. Randy publishes www.UltimateWindowsSecurity.com
and wrote The Windows Server 2008 Security Log Revealed—the only book devoted
to the Windows security log. Randy is the creator of LOGbinder software, which
makes cryptic application logs understandable and available to log-management
and SIEM solutions. As a Certified Information Systems Auditor, Randy performs
security reviews for clients ranging from small, privately held firms to
Fortune 500 companies, national, and international organizations. Randy is also
a Microsoft Security Most Valuable Professional.
Disclaimer
Monterey Technology Group, Inc. and Dell Software make no
claim that use of this white paper will assure a successful outcome. Readers
use all information within this document at their own risk.